Cart 0

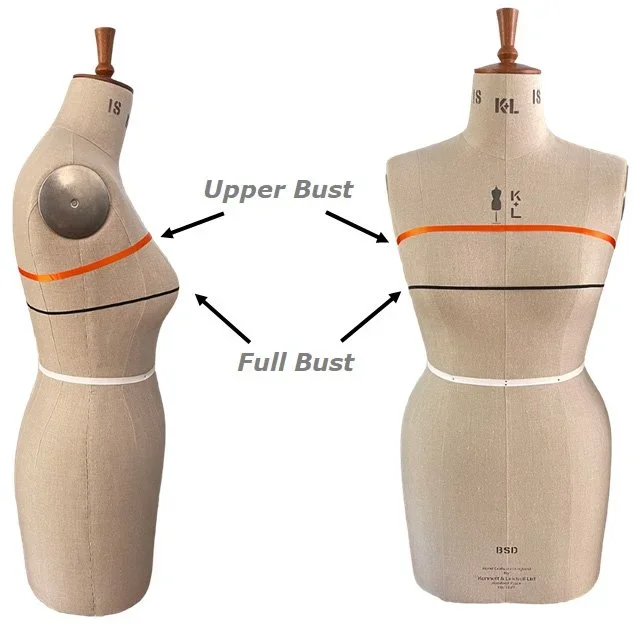
Let’s Talk sweater fit 2 -

Compound Raglan Shaping

Compound raglan shaping is one of those subtle sweater-design techniques that can completely change how a raglan garment fits and hangs on the body.

In a standard raglan, increases (or decreases) are worked at a consistent rate from underarm to neckline. That creates the familiar diagonal raglan lines — but it can also create common fit problems:

  • a neckline that sits too wide or too low

  • excess fabric pooling at the upper chest

  • loose or collapsing sleeve caps

  • deep armholes that restrict movement or look oversized

  • shoulders that appear bulky instead of tailored

Compound shaping solves this by varying the rate of shaping throughout the yoke rather than increasing evenly all the way through.

What Compound Raglan Shaping Does

Instead of:

  • increasing every other round consistently

a compound raglan might:

  • increase rapidly near the neckline

  • then slow the shaping through the upper chest and shoulders

  • then change again approaching the underarm

This creates a yoke that follows the body’s actual geometry more closely.

The result:

  • higher, cleaner armholes

  • a neckline that sits properly

  • sleeves that angle more naturally from the shoulder

  • less excess fabric at the front underarm

  • a slimmer, more tailored silhouette without tightness

Why It Helps Fit So Much

Human bodies are not linear shapes.

Your shoulder slope, upper chest depth, bust, and arm circumference all change at different rates. Traditional raglan shaping assumes they all expand uniformly — which rarely matches real anatomy.

Compound shaping allows:

  • shoulder shaping without over-expanding the chest

  • sleeve growth independent from body growth

  • better balance between front/back depth and sleeve cap shape

That’s especially useful if:

  • you have narrow shoulders and fuller bust/upper arms

  • you are petite or tall

  • your upper torso proportions are outside “standard” grading

  • you prefer a closer fit rather than oversized silhouettes

Top-Down vs Bottom-Up

Neither construction method automatically guarantees better fit — compound shaping can be used in both.

Top-down advantages

  • easier to try on as you knit

  • easier to customize yoke depth

  • convenient for adjusting sleeve/body length

Bottom-up advantages

  • sometimes gives cleaner shoulder structure

  • easier to refine sleeve cap geometry in some designs

  • can produce a slightly more tailored drape

What matters more is whether the pattern uses thoughtful shaping logic.

Signs a Pattern Uses Compound Raglan Shaping

Look for:

  • varying increase rates

  • sections with different increase intervals

  • references to “compound raglan”

  • tailored or anatomical fit language

  • higher armhole/yoke shaping

  • neck shaping integrated into the raglan

Designers focused on fit engineering often mention this explicitly because it materially changes the finished garment.
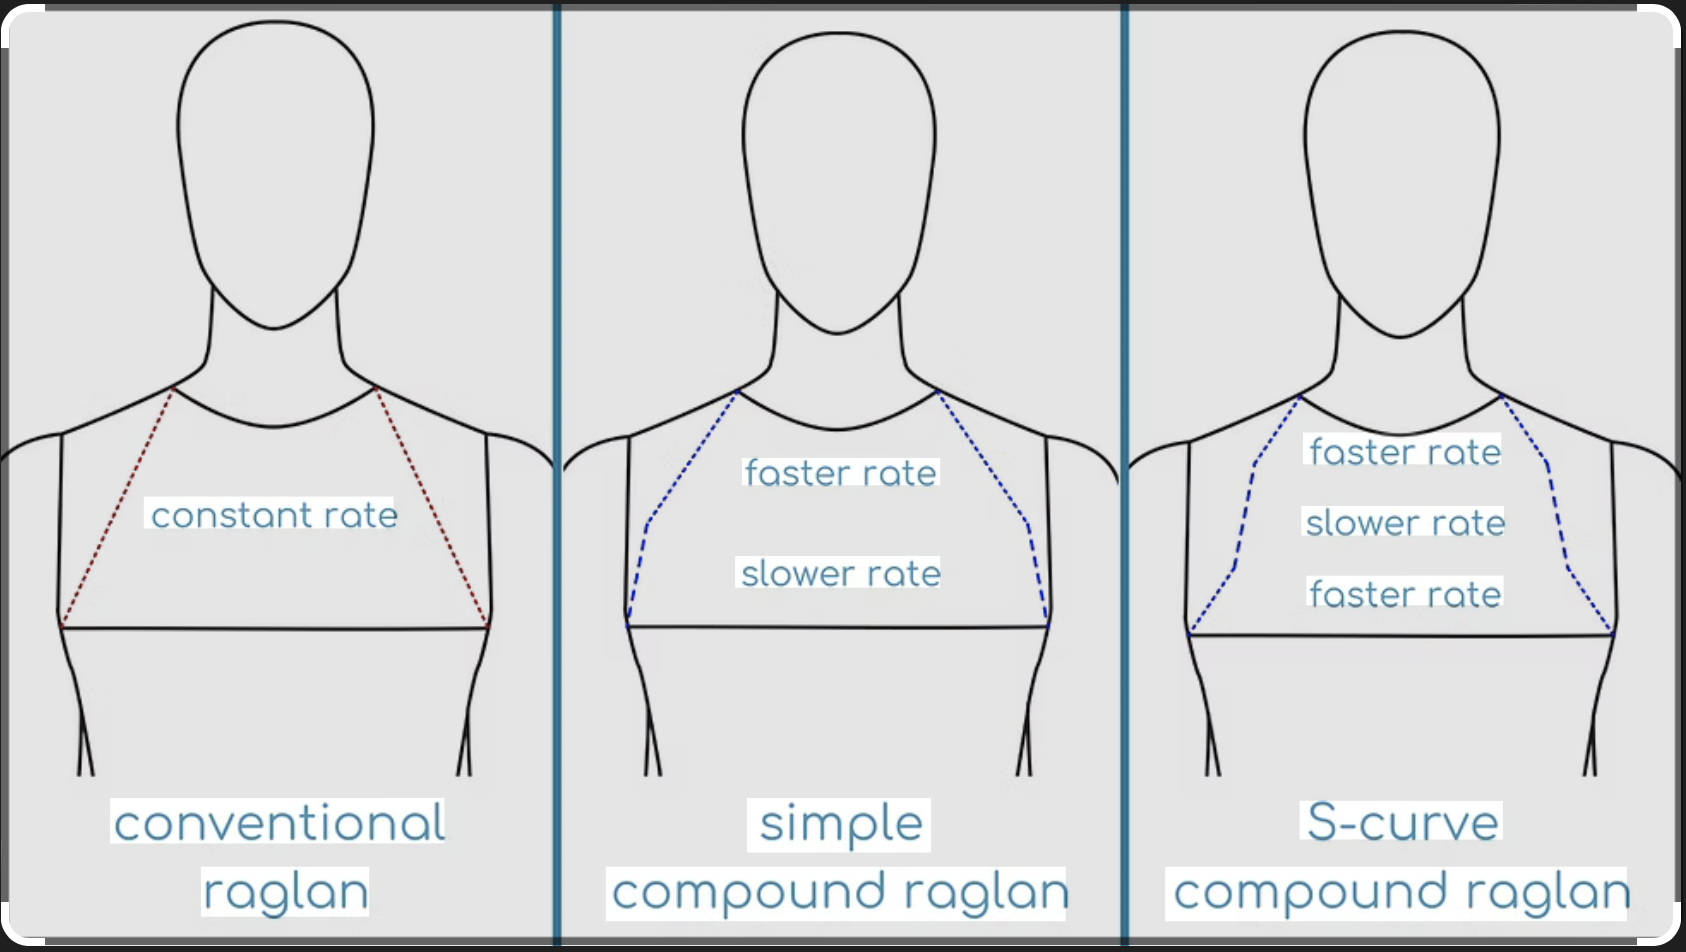
Visual Difference

Here’s the basic idea:

Standard Raglan

same increase rate throughout
\
 \
  \
   \

Compound Raglan

faster shaping near neck
\
 \
  \
   \__
       \

That subtle change alters where fabric distributes across the shoulders and upper chest.

KnitCalcs Raglan and Shaping calculator tool - useful if you’re going to draft your own raglan calculations or even if you’re modifying

Is It Worth Learning?

Absolutely — especially if:

raglans often feel sloppy on you

you dislike oversized yokes

you want sweaters that look more polished and intentional

you design your own garments

you modify patterns frequently

Once you understand compound shaping, it becomes much easier to predict how a sweater will fit before you knit it.


Let’s Talk Sweater Fit - 1


🧷 Tips for accurate measurements

Use a soft, flexible tape measure (dressmaker’s tape).

Wear a lightly fitted, non-padded bra (or no bra) so your bust shape isn’t distorted.

Keep the tape parallel to the floor all around (front and back).

Under bust measurement

The 2nd key measurement you need

Don’t pull the tape measure too tight — it should be snug but not compressing your body.

Breathe naturally while measuring and avoid holding your breath.

It helps to do each measurement twice to check consistency.


Choosing the Right Sweater Size

At the recent Knit & Stitch show at Ally Pally, I had lots of questions about how to choose the right sweater size.

What really surprised me was how many people didn’t know their full bust measurement — and while that’s an important starting point, it’s not the only one that matters when picking your size from a pattern.

To get the best possible fit, especially through the shoulders (which are key to a well-fitting sweater), you’ll need three torso measurements:

  • Full bust circumference

  • Upper bust circumference (above the bust, under the armpits)

  • Bicep circumference

Used together, these 3 measurements will help you determine the best size for your body.

How to Choose Your Size

  • If both your full bust and bicep measurements fall in the same size bracket in the pattern or schematic — great! That’s your size.

  • If your full bust is smaller than your bicep measurement, choose the size that fits your bicep, but plan to make a full bust adjustment (FBA).

  • If your bicep measurement places you in a smaller size than your full bust, (ie your bust measurement is greater than your bicep measurement) check your upper bust measurement. If your upper bust is closer to your bicep measurement, go with that size and work a bust adjustment.

Knowing and using all three measurements will give you a much better fit — especially through the shoulders and arms — and help your sweaters look and feel as good as they should.


The flower puff Bag

This sweet little bag sprang into existence, thanks to a deep dive into a Pinterest rabbit hole. I was looking for colour inspiration when I stumbled across some beautiful crochet bags adorned with floral motifs—and instantly fell in love!

I couldn’t get them out of my head, so I did a little stash dive (no small feat with a stash as big as mine!) and pulled together a selection of mostly leftover yarns in 2 select colour families.

The puff flowers are such a joy to make—simple, fun, and totally addictive. To help you create your own version of this bag, I’ve put together a PDF guide with step-by-step instructions and useful links. It’s more of a “recipe” than a strict pattern, so it assumes you’re already comfortable with basic crochet stitches and construction.

To make things even easier, I’ve created a couple of Yarn Kits and pulled together two dreamy colour palettes:

  • Autumn Glow : transition from deep earthy peach and burnt orange into creamy silver, with delicate touches of apricot and peach.

  • Vintage Vibe : playful violets, dusty mauve and rich dark plums, capture a timeless vintage feel,

    for my sample I balanced all this loveliness with a background of one of my all-time favourite Black Light shades, Tarmac—a deep black/graphite with subtle red undertones.

  • Each set comprises:

  • 6 colours; 50g / 100m skeins (300g / 600m total in each pack)

  • 1 pack is enough yarn for 17 flower clusters (each cluster uses around 32–34g)

  • If you want to make the bag exactly as mine - you’ll need both sets for the flowers clusters, (1 of each colour way) plus 1 full size skein (115g) of a Main Colour for the squares, joins, edging, and handles.

For the bag sample, I tried many different methods to make the handles, eventually using a simple slip stitch crochet method to create sturdy handles, and added a bag base for extra stability.

Whether you go for glow or that vintage vibe, this project is a joy to make—and even more fun to carry.

Get the PDF here


A New Yarn Collection, Born of Land and Sea

Tweedie 4 Ply is the first base from our new heritage range; Town & Country to make its debut this October. Twelve colours, each carrying the soul of the landscape. From the windswept shores of Northern Ireland to the rolling Scottish hills, from ruined castles to shipwrecked coasts — hues shaped by time, mystery, and memory, we can’t wait for you to be among the first to experience this yarn!

Tweed, originally designed for warmth and practicality—Tweedie reimagines tradition for today’s maker and celebrates rustic tweed heritage with modern wearability. We’ve opted for next-to-skin soft Merino with naturally coloured neps to capture the rich texture and timeless charm of tweed, while keeping it beautifully wearable.

Each 100g skein holds a generous 400m of soft Merino, making it the perfect choice for your autumn and winter projects.


Cloud 9 - new yarn base

An exciting new addition to our Catalogue

high silk content - 70% Silk coupled with Superfine NSW Merino 30%

Brushed Boucle construction

matte finish

no shedding

Knits up to a super light and airy fabric

200m/50g - fingering weight that suits needle sizes from 3.75mm - 5.00mm

Sample shown is Stockholm Slipover by PetitKnits - knit on 5mm needles

THE RECENTLY LAUNCHED CLOUD 9

We have had a lot of requests for pattern ideas for this lovely new to the market yarn base. It is unique and there isn’t really anything else like it out there.

Listed below are just some of the pattern ideas we think would be great to show off this beautiful yarn. with links to their pattern pages on Ravelry

Alternatively you can head over to Ravelry search my favourites for the Bundle: Cloud 9 ideas to get a more comprehensive list

CLOUD 9 - NEW YARN PATTERN IDEAS

Summer Light - Julie Knits in Paris

Stockholm Slipover - Petit Knits

The Wisp Tank - Caitlin Hunter - release date soon

Spring Chicken - Beata Jazek

Moon Bumps - Maxim Cyr

Velvet Mirror Cowl - Andrea Mowry